Sonoff
Sonoff is a product line of home automation devices which communicate via WiFi. The chinese manufacturer also provides a cloud service and an App to controll all the dvices in your home network.
the most popular sonoff product is their sonoff basic, a single relay on/off switch. It became hugely popular because of two things:
- it is extreamly cheap! (as in $5 on Aliexpress / Banggood / ebay etc.)
- it is based on an ESP8266 which by itself is an extremely popular module and for which multiple firmware variants exist including an arduino compatible one. in other words, the sonoff-basic can be re-flashed with an arduino firmware and then used for whatever you want.
Hack it without changing firmware
but even without re-flashing the sonoff switch, it is possible to use it without their cloud service
alternative firmware
-
- works also on lots of ESP based devices and can be easily adopted to support even more. for example MagicHome RGB LED Controllers
- provides control via serial / web / MQTT
What I intend to do with it
I use digitalSTROM as my main bus system in my House. It has a web-interface served by the “DitialSTROM Server” (DSS) which allows the definition of rooms and scenes. Devices can be assigned to rooms and then different scenes can be programmed for each room or section of a room. Further more, the DSS provides a JSON web-api which enables the use of external tools to control or monitor the stat of the House. DigitalSTORM communicates over a sort of powerline network, so it needs no extra cables for the bus lines but it isn't exactly wireless either. For this to work you need to put a singnal-injector behind every circuit breaker in your house. the injectors are connected to one another and make sure, that all your devices can talk to one another even if they are on different phases of your mains power line.
My house contains two appartments. One of which is equipped with digitalSTROM, the other one isn't. Unfortunately, some lights, like for example the flood light for the garden, which is mounted under the roof, are fed from the upstairs appartments power which is not digitalSTROM enabled. It would be hidiously expensive and I don't have any space left in the upstairs fuse box to mount all the digitalSTORM injectors and stuff just to get one Light onto my bus. That's where sonoffs come in. by connecting a sonoff to my WiFi netowrk and linking it to my digitalSTROM server, i can control the flood light over my digitalSTROM environment even if it is not in the same bus.
since there is the Tasmota Firmware for sonoff that supports MQTT and there is also an MQTT bridge for digitalSTROM and because MQTT seems to be a nice protocol for IoT applications, i decided to use that to glue the two things together :)
at first i will use the existing MQTT bridge for DS which uses the Web-API. In the future i would like to write a little module that uses the Virtual Device API of digitalSTROM which would allow me to emualte a digitalSTROM device for my sonoff. this would make the integration even smoother and there would be no need for an external rules engine anymore. However, i'll get started with the web-api and rules engine first, as I'd like to try out some MQTT stuff first :)
The simple solution
Isn't there a simple solution to that? Shure there is, but what fun would it be? :)
the digitalSTROM server comes with some “apps” that can be installed on it via a repository. one of the standard apps that is even pre-installed is called Event-Responder and does all we need in order to get our sonoff to turn on and off depending on scenes selected in rooms. Because it is so easy to do, I will quickly hightlight how to do all that before I explain the more complex solution:
You can either flash the Tasmona firmware as described below or hack your sonoff in any other way with any other firmware or even with the original firmware in place. All you need to achieve is, that you can send a http-get request to the sonoff to turn the light on and off. Tasmona does that, and since I am going to use it anyway for my project, I will assume you also flashed that. Also this solution requires the sonoff to have a static IP .. either do this with a reservation in your DHCP server or enter a fixed IP in the web-interface of Tasmona.
In the dss web menu go to apps and open the Event-Responder app. create a new event and select the room and scene you want to use as trigger for your sonoff to turn on. as initiated activity select “Call URL” and enter http://<sonoff-ip>/cm?cmnd=Power%20On. then give it some useful name and save.
Create a second Responder, but this time select all other scenes in the same room as trigger (you can do that by holding CTRL on your keyboard while clicking on all the scenes you do NOT want your light to be on). then as action use again Call URL but this time enter http://<sonoff-ip>/cm?cmnd=Power%20Off.
that's it, you're all set. Congratulations you just saved yourself a day worth of fiddling with tools and scripts :) So why am I still going down the complicated route.. well, mainly because I can :) and also because i want to use more devices including some input devices in the future to do more complicated stuff which exceeds the capabilities of my DSS. Also, the Event-Responder is quite slow, it is even slower than my first solution with the DSS-API based mqtt-connector. So expect to wait 2-3 seconds for your light to go on. Unless you have a newer DSS than me. The newer models (DSS20 and 22) have faster cpu's and should be able to process these responders alot quicker.
Falshing Tasmota Firmware
this is straight forward, just follow the guides on the Tasmota github site. there is a wiki with loads of information.
I personally went for flashing over a USB TTL adapter using the Arduino IDE. It is important to notice, that the TTL adapter needs to provide 3.3V, not 5V! Also i recommend using a PL2303 based USB TTL adapter, as others did not work for me (spent hours trying until I finally gave up and tried with a PL2303 based one I had laying around). Another important Point was, how to enter the programming mode: Hold down the pushbutton while connecting only the power pins. Leave at least one of the two data pins disconnected. Then let go of the button and connect the RX and TX (crossed). Flasing did not work for me when i connected all wires at the same time while holding down the button.
I strongly recommend to edit the settings before compiling and adding your wifi credentials, this will save some time and hassle when configuring the device later on. It will simply connect to your wifi and you can access its webpage to do the rest of the configuration. Update: don't do this! whenever possible, flash the stock tasmota.bin file, it is alot easier to do so and your sonoff will fall back to a setup mode if the wifi password has changed and it can no longer login.. also with new tools such as Tasmotizer, the credentials can be configured after flashing over the serial connection which makes it much easier than hardcoding and compiling your settings.
Here are the steps it took to flash the stock sonoff (current and more detailed instructions can be found in the Tasmota wiki
Update: again, the instructions below are obsolete and may only be valid if you want to re-compile tasmota.. but you rarely will have to do that.. Instead i recommend using Tasmotizer, a very simple python gui which can be installed using pip3 on Windows, linux and mac (for widows there is even an exe installer). besides flashing your tasmota compatible device it can also set your wifi settings and subsequently show the ip of the device as long as it is still attached to the serial interface.
here are the steps using Tasmotizer:
- install tasmotizer:
pip3 install --upgrade pip wheel
pip3 install tasmotizer
tasmotizer.py
- under “Select Image” choose “release” and then select whatever image you want to flash, in most cases this will be
tasmota.bin - connect your sonoff to the serial2usb adapter WITH MAINS DISCONNECTED!! here is the necessary wiring.. note that rx and tx are crossed over between the two devices. VCC is 3.3V NOT 5V!
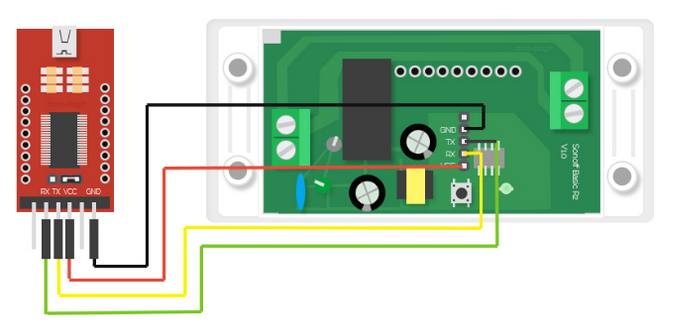
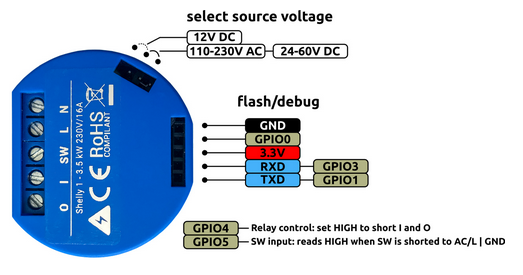
- here's the pinout for a shelly1 .. with the shelly1 you need to connect the gpio1 pin to ground whil you power it on in order to get it into flash mode..
- hold down the push button and plug-in the usb adapter.
- let go of the push button and click “refresh” next to the “Select Port” drop down. most likely this will see and select your usb adapter
- click “Tasmotize” and wait for it to erase and reflash your device.
- once that is done, unplug your usb adapter and plug it back in, to reset the sonof
- now click on send config and enter your desired config, then upload it.
- a few seconds later, your sonoff sould be connected to your network and with Get IP you can now see the ip it got from your DHCP.


If you really want to compile tasmota yourself, you should read the official documentation, as what follows now is already several years old and probably no longer exactly true. however, I wrote it, so here it is anyway :) ..
- download the sourcecode tar.gz or zip package from the Tasmota releases page
- extract the contents of the
libdirectory into your arduino ide'sportable/sketchbook/librariesdirectory and extract the entiresonoffdirectory into your arduin IDE'sportable/sketchbook/directory - edit
user_config.hand enter your wifi name and password. all other settings can be changed later once the device is booted, but you can of course set them here if you want. this will make it much faster if you flash alot of these devices and want the same settings on all of them. - make sure your sonoff is disconnected from the AC power lines*
- Open sonoff and plug in some Male-Female dupond cables (jumper cables). The 5 pins going from the pushbutton towards the long row of holes are what will be used here. the pin closest to the pushbutton is the +3.3V pin, followed by RX, TX, GND, GPIO14. You won't need GPIO14. On my first unit I soldered a set of pin headers onto the holes, but that's usually not necessary if you have the right cables at hand.
- connect 3.3V and GND and to the USB TTL, hold down the pushbutton and plug the USB-TTL into your computers USB Port
- now connect the sonoff's RX to your USB-TTL's TX and vice versa
- click the upload button on your arduino IDE. it will compile and upload the image.
- once the upload is complete, disconnect the USB TTL from your computer and plug it back in a few seconds later. your sonoff should now boot (green light flashes shortly) and after a while it should be connected to your wifi and it should serve a web interface on its ip address. in case you can't reach it, try pushing the button once to turn on the LED, this might also activate the webserver on first boot.
- once you have verified that the firmware boots okay, you can simply disconnect the dupond cables and assemble the case again, before you connect your sonoff to the AC power source.
setting up a MQTT server
I have to say this is the first time i got in contact with MQTT. MQTT is a light weight protocol which is becoming more and more popular for IoT applications. It works on a subscribe/publish basis. There are MQTT clients and there is one MQTT Broaker or Server (same thing). Clients can both publish and subscribe to topics on the broker. a topic “name” is like a linux path. it can have several levels which can be freely chosen. To make things clearer, here is an example with our sonoff device:
- lets assume our sonoff device controls a light in the garden. we therefore call it
garden_light - the sonoff device is an MQTT client. it subscribes at the broker mqtt.psuter.ch to the topic
cmnd/garden_light/powerand it publishes amongst other things the topicstat/garden_light/power - on a computer we can subscribe to the topic
stat/garden_light/#and then publish to the topiccmnd/garden_light/powerand set a value of 1. - since the sonoff is a subscriber of
cmnd/garden_light/powerit will receive our published infomration1for that specific topic. the sonoffs firmware will then turn on the light. this causes the status of the relay to change to “ON”, so it will publish tostat/garden_light/powerand set a value toON. - the broker will now look for clients holding a subscription for
stat/garden_light/powerand it finds our PC which did subscribe to all sub-topics ofstat/garden_lightand hence gets the updated value forpower
there is a more detailed overview at HiveMQ and another one at steves-internet-guide.
while one can use a public MQTT server as well, I prefer to have such things at home. Especially since by default Tasmota does not support SSL encryption. Also it is always when you don't need to bother so much about security when first trying out new stuff :)
Mosquitto is an open-source MQTT server or broker, which I am going to install and configure here to handle all sonoff devices. Luckily it is already pre-packed in most distributions, so we don't need to go through a lengthy installation process:
- set up the server (on
mqtt.psuter.chin my case, which runs ubuntu)apt install mosquitto- add some custom configuration options to
/etc/mosquitto/conf.d/custom.conf:log_type all connection_messages true log_timestamp true allow_anonymous false password_file /etc/mosquitto/pwdfile
this will mainly log verbosely to the default log-file which is at
/var/log/mosquitto/mosquitto.logand it will require authentication. albeit in plaintext, but it's better than nothing i guess ;) - restart the server.. now i had to stop and start it as it seems to try to start too quick after stopping and the socket might not be free for the new service to start..
    - now we need to create our password file <code>
mosquitto_passwd -c /etc/mosquitto/pwdfile sonoffs
chown mosquitto.mosquitto /etc/mosquitto/pwdfile
chmod 600 /etc/mosquitto/pwdfile
and enter the desired password for our sonoff devices
systemctl stop mosquitto.service
systemctl start mosquitto.service
- in a window open the log file to track what's going on :)
tail -f /var/log/mosquitto/mosquitto.log
- configure the sonoff device:
- in the sonoffs web interface, go to
Configuration - Configure Otherand make usre MQTT is enabled - then go to
Configuration - Configure MQTTand enter the host name of your server (in my casemqtt.psuter.ch), set the client togardenand the user tosonoffsand enter your recently set password. also set the topic togarden_lightand click save. - after a few seconds you should see some movement in your mosquitto log.. your sonoff should register and enter its subscriptions and publish its state.
- install a client to test the server
- this is of course optional, but it certainly helps in understanding MQTT to play around with the mosquitto_client.
- on a client machine (can be the server as well or any other linux machine in your network) install the
msoquitto-clientpackage:sudo apt install mosquitto-clients
- now start a client and subscribe to the sonoff topics
mosquitto_sub -h mqtt.psuter.ch -u sonoffs -P sonoff -t stat/garden_light/#
note that the
#is a multi-wildcard and a+is a single-wildcard. this means that a+in a topic can only replace one level, while#can replace several levels at once. - if you now press the button on your sonoff, you will receive a status message on your client which was published to the broker and then handed to your client since it had a subscription for that topic.
- vice-versa, you can now, preferrably in a second terminal on the same machine publish another topic to turn the light on (or off), whatever makes sense:
mosquitto_pub -h mqtt.psuter.ch -u sonoffs -P sonoff -t cmnd/garden_light/power -m 0
now you can see the information flow described at the beginin of this section.
MQTT interface for digitalSTROM
Chriss Gross wrote a MQTT Bridge for digitalSTROM in node.js and kinly made it available to all of us on GitHub.
Unfortunately there isn't much documentation around there, so at least this time it makes sense for me to write everything down in here that i found out about it :)
in order to set it up, simply install it through npm:
npm install --save mqtt-dss-bridge
this will create a sub-directory node_modules/mqtt-dss-bridge. In there you can find the config.js file where you can configure the bridge. You can leave most of it at the default but some things need to be adjusted:
refreshInterval: 5000 milliseconds might be too long.. i set it down to 1000 for now which still is quite laggy when you want to turn other lights on or off in a room based on room actions. but since it needs to poll all the information via the API every time in that interval 1s is about all i can get. If i lower it furher it actually gets slower and the digitalSTROM app starts to be laggy too. Your mileage may vary depending on the size of your DS installation i guess.urlof the MQTT client: i left it at localhost, as this is running on the same serverurlof the DigitalSTROM server: this is where you need to enter your DSS' IP Address. Leave the Port at 8080, as the API uses a different port than your web-interfaceappToken: this was the tricky part: first open the url https://<yourDSShere>:8080/json/system/requestApplicationToken?applicationName=dssBridget in a browser where you are not logged-in to the digitalSTROM Server's web-interface. you will receive an appToken in the response. Copy/Paste that token into your config.js. Following that, log-in to your DSS Web-Interface and go to the advanced view → system → Access Authorization. in there you should now see an entry for “dssBridget” with the ending of the access token shown behind it. check the checkbox and click apply. only now, your mqtt bridge will actually have access to the DSS.- since this mqtt bridge does not seem to be set up to support any authentication or other security for now, I simply enabled anonymous access to my MQTT server. certainly not something i want to keep this way for ever, but that has to wait until i got it all sorted out :)
now simply run node index.js to start the bridge.
you will notice alot of activity in your mosquitto log :)
in order to see all the topics your dss publishes, you may run a mosquitto_sub client that subscribes to dss/# like so:
mosquitto_sub -h mqtt.psuter.ch -u sonoffs -P sonoff -v -t dss/#
this helps in finding your way around the massive amount of inormation that is published by the dss bridge.
Since my goal for now is to turn on my sonoff when a certain scene is selected in a room i am most interested in the topic dss/apartment/zones/Garden/groups/1/lastCalledScene. with the above command I found out, that when i select scene 1 the value of that topic acutally becomes a json value of { “$value”:5 }. When the light is turned off, the value changes to 0 instead. Scene2 has a value of 17, scene3 is 18 and scene4 is 19.
In order to turn the lights on in a room, you can publish to the topic set/dss/apartment/zones/Garden/groups/1/lastCalledScene and set the value to 5 or 0. here is an example using mosquitto_pub:
mosquitto_pub -h mqtt.psuter.ch -u sonoffs -P sonoff -t set/dss/apartment/zones/Garden/groups/1/lastCalledScene -m 5
Rules Engine - node-red
Now that we got both our devices connected to the MQTT Broaker it is time to set up a Rules engine, to conenct the two together :)
node-red looks like a very capable and interesting Rules engine. I have also spotted another interesting open source project called https://thingsboard.io/ which seems to be interesting for monitoring stuff. not in my focus right now, but worth a mention in order to investigate it later some day :)
installation is again very easy through npm:
npm install node-red
they recommend a global install, but i'll stick with a local one for now :)
now simply cd into the directory node_modules/node-red and run node-js from there with the default settings for now:
./red.js
it tells you the server is running on 127.0.0.1 which normally means it accepts local connections only, but that's actually not ture, it is bound to 0.0.0.0 and accepts connection from your entire network. simply open http://<ourserver>:1880 in a browser and start drag-n-dropping your flows :)
while programming without writing anything might be easy, it certainly makes it harder to describe what comes next:
- create a new flow and start with an mqtt input. first create a new mqtt server and enter your server address and credentials in there. then enter the input-topic (in MQTT terms, tell node-red what to subscribe to). in our case that is
dss/apartment/zones/Garden/groups/1/lastCalledSceneand give it some name - create a
jsonfunction node and link your input to the json node. - from the json node link to a
switchnode. entermsg.payload.$valueas the property (note the $ sign is probably a mistake in the mqtt-dss-bridge as it adds a $ in front of the key name in the json output.. so “$value” is actually the name of the variable containing the value.. a bit confusing.. ) and add two conditions.. the first==5and the second!=5. - now from the first condition link to a new
changenode and setmsg.payload=ON. from the second condition output link to a newchangenode with themsg.payload=OFF. - from both these change nodes link to the same
mqttoutput node. choose again your nodejs server and enter the topiccmnd/garden_light/power - now hit “deploy” in the upper right corner, make sure your mqtt broker is running, mqtt-dss bridge is running and your sonoff is connected.
your sonoff should now turn on when scene1 is selected in the “Garden” room and it should turn off when any other scene is selected.
here is the exported flow in case you want to import that into your Node-RED editor to make sure you have the same settings:
[{"id":"72ae1fa8.3120d8","type":"mqtt in","z":"3bd0c5c5.ad27c2","name":"Garden Scene","topic":"dss/apartment/zones/Garden/groups/1/lastCalledScene","qos":"0","broker":"f0595b86.397c3","x":100,"y":200,"wires":[["80de7c5f.1a0798"]]},{"id":"2cbc4b68.51c464","type":"mqtt out","z":"3bd0c5c5.ad27c2","name":"garden light","topic":"cmnd/garden_light/power","qos":"","retain":"","broker":"f0595b86.397c3","x":550,"y":300,"wires":[]},{"id":"80de7c5f.1a0798","type":"json","z":"3bd0c5c5.ad27c2","name":"value","pretty":false,"x":110,"y":300,"wires":[["da2d017b.eb802"]]},{"id":"da2d017b.eb802","type":"switch","z":"3bd0c5c5.ad27c2","name":"turn on or off","property":"payload.$value","propertyType":"msg","rules":[{"t":"eq","v":"5","vt":"num"},{"t":"neq","v":"5","vt":"num"}],"checkall":"false","outputs":2,"x":310,"y":300,"wires":[["22f400d9.731088"],["16df239f.b6f35c"]]},{"id":"22f400d9.731088","type":"change","z":"3bd0c5c5.ad27c2","name":"ON","rules":[{"t":"set","p":"payload","pt":"msg","to":"ON","tot":"str"}],"action":"","property":"","from":"","to":"","reg":false,"x":430,"y":240,"wires":[["2cbc4b68.51c464"]]},{"id":"16df239f.b6f35c","type":"change","z":"3bd0c5c5.ad27c2","name":"OFF","rules":[{"t":"set","p":"payload","pt":"msg","to":"OFF","tot":"str"}],"action":"","property":"","from":"","to":"","reg":false,"x":410,"y":360,"wires":[["2cbc4b68.51c464"]]},{"id":"f0595b86.397c3","type":"mqtt-broker","z":"","broker":"localhost","port":"1883","clientid":"nodered","usetls":false,"compatmode":true,"keepalive":"60","cleansession":true,"willTopic":"","willQos":"0","willPayload":"","birthTopic":"","birthQos":"0","birthPayload":""}]
and here is what it looks like:

a word about retention
it seems node-red sets the retention flag of mqtt by default. I learned this when i used it together with the mqtt-dss-connector: i created a rule that turned the light in the bathroom on. if i turned it off later (not via node-red) and then restarted the mqtt-dss-bridge the light in my bathroom went on again “for no reason” .. this was because that on command was published with the retention flag set to on (or actually not set to anything in node-red). so i set it to “false” and the problem was resolved.
Making the installation permanent
this might be different in your setup, but I would like to install the npm modules globally and then run them as non-root users through a systemd script to make sure they are auto-startet as soon as my system boots.
before you start, make sure you export your node-red flow to a file or at least past it into a text editor so you have it available later to restore it. then stop mqtt-dss-bridge and node-red
the easy one first: Mosquitto. Since we used the ubuntu package, it already came with the necessary startup scripts, so a simple
systemctl enable mosquitto.service
is enough :)
now lets install our npm modules (node-red and mqtt-dss-bridge) globally:
npm install --global --save mqtt-dss-bridge
npm install --global --save --unsafe-perm node-red
create the users and groups to run these tools:
addgroup --system mqtt-dss-bridge
addgroup --system node-red
adduser --system --no-create-home --ingroup mqtt-dss-bridge mqtt-dss-bridge
adduser --system --ingroup node-red node-red
copy the mqtt-dss-bridge config.js file to /usr/local/lib/node_modules/mqtt-dss-bridge/config.js
It happened a couple of times, that the mqtt-dss-bridge process was running without actually updating the state of the dss target. this happened after some network issues for example. since the mqtt-dss-bridge process did not exit but rather continued to run and just do nothing, systemd did not notice any problem and did not restart the service. for that reason I created a little wrapper script which checks the age of the last status update and exits with exit code 1 if that state is older than 10 seconds for longer than 10 seconds (it usually takes a couple of seconds upon starting the gateway to catch up, hence we wait 10 addiitonal seconds before killing mqtt-dss-bridge and exiting with an error state)
This wrapper also mutes the output of mqtt-dss-bridge which otherwise floods your syslog.
save this script to a convenient location such as /usr/local/bin/mqtt-dss-bridge.sh
- /usr/local/bin/mqtt-dss-bridge.sh
#!/bin/bash

# start the bridge in the background
/usr/bin/node /usr/local/lib/node_modules/mqtt-dss-bridge/index.js > /dev/null 2>&1 &
PID=$!
echo "DSS Bridge started with PID $PID"
# start a loop to monitor the status every second
errcntr=0
lastUpdate=999
while true; do
    lastUpdate=$(( \
            $(date +%s)\
            -\
            $(date -d "$(\
                mosquitto_sub -h localhost -u sonoffs -P sonoff -t dss/state/lastDiscovered -C 1 | \
                sed -E -e 's/"([0-9]{4}-[0-9]{2}-[0-9]{2})T([0-9]{2}:[0-9]{2}:[0-9]{2}).*$/\1 \2Z/'\
            )" +%s)\
        ))
    if [ 10 -lt $lastUpdate ]; then
            if [ $errcntr -lt 10 ]; then
                let errcntr++
                echo "DSS Bridge state is too old (last updated $lastUpdate seconds ago, max 10 allowed). This was failure $errcntr out of 10 accepted failures"
            else
                echo "DSS bridge state is still too old ($lastUpdate seconds) after 10 retries. killing mqtt-dss-bridge (pid $PID) and exit with error status 1"
                kill $PID
                exit 1
            fi
	fi
    sleep 1
done
create the startup service file for mqtt-dss-bridge:
cat > /etc/systemd/system/mqtt-dss-bridge.service <<EOF
[Unit]
Description=Node.js MQTT DSS Bridge
# Requires the mosquitto service to run first
Requires=After=mosquitto.service

[Service]
#ExecStartPre=/bin/sleep 60
ExecStart=/usr/local/bin/mqtt-dss-bridge.sh
# Required on some systems
#WorkingDirectory=/usr/local/lib/node_modules/mqtt-dss-bridge/
Restart=always
 # Restart service after 10 seconds if wrapper exits with code > 0
RestartSec=10
 # Output to syslog
StandardOutput=syslog
StandardError=syslog
SyslogIdentifier=mqtt-dss-bridge
User=mqtt-dss-bridge
Group=mqtt-dss-bridge
Environment=NODE_ENV=production

[Install]
WantedBy=multi-user.target
EOF
create systemd service for node-red
cat > /etc/systemd/system/node-red.service <<EOF
[Unit]
Description=Node.js Node-RED
Requires=node-red.service       # starts node-red first when this service is started manually
After=node-red.service       # starts this after node-red on boot

[Service]
ExecStart=/usr/local/bin/node-red
# Required on some systems
WorkingDirectory=/home/node-red
Restart=always
 # Restart service after 10 seconds if node service crashes
RestartSec=10
 # Output to syslog
StandardOutput=syslog
StandardError=syslog
SyslogIdentifier=node-red
User=node-red
Group=node-red
Environment=NODE_ENV=production PORT=1880

[Install]
WantedBy=multi-user.target
EOF
create a rule for rsyslogd to log messages from mqtt-dss-bridge into a separate file:
cat > /etc/rsyslog.d/mqtt-dss-server.conf <<EOF
if \$programname == 'mqtt-dss-bridge' then /var/log/mqtt-dss-bridge.log
if \$programname == 'mqtt-dss-bridge' then ~
EOF
create a rule for rsyslogd to log messages from node-red into a separate file:
cat > /etc/rsyslog.d/node-red.conf <<EOF
if \$programname == 'node-red' then /var/log/node-red.log
if \$programname == 'node-red' then ~
EOF
restart rsyslogd and reload systemd
systemctl restart rsyslog.service
systemctl daemon-reload
systemctl start mqtt-dss-bridge.service
systemctl start node-red.service
check if the services are all running fine. if that is the case, enable them to autostart on boot:
systemctl enable mqtt-dss-bridge.service
systemctl enable node-red
now restore your node-red settings
Next Steps
try to get mqtt-dss-bridge to use some sort of authentication. for encryption is not that important as the sonoff's probably won't have enough power to use encryption, and that's where it's needed most. (see #146)
Future projects
eventually I'd like to write a script that uses the plan44 vdcd external device API to integrate a sonoff device into a digitalSTROM setup as an emulated digitalstorm device. this will overcome the lag that is generated by querying the Web-API. we could then also create a dummy light bulb which will just publish its state to MQTT. by assigning it a different value for all of the scenes it is in, we can pass the room-state to MQTT with almost no lag. This will enable other devices like the sonoff to react immediately and not just during the next poll-interval.
see my progress on that at MQTT for digitalSTROM