This is an old revision of the document!
silhouette cameo 4 - inkscape vs. silhouette studio basic
i just bought a Silhouette Cameo 4 cutter with the goal to produce some self-made gaming cards of an old family game we had wen i grew up.
I quickly realized that linux support might be cumbresome as there is an old inkscape plug-in and tuxplot which knowingly has issues with Ubuntu 20.04. Since, as always, i'm getting my christmas presents ready on the last minute, i wanted to just go the easy route and do use my wife's Windows notebook for once, to use the original Silhouette Studio Basic software that comes with the cutter.
for my playing cards i want to do what is called “Print and Cut”, which means, you print the cards on a sheet of (A4) paper with a regular printer. In addition to the graphics for the cards, there is going to be some calibration marks for the cutter, to get scan and calculate the exact positioning of the paper before cutting the contours that where programmed using the Silhouette Sudio Application.
the workflow is supposed to be pretty simple, you just open the studio app, import your graphics, choose the cutting strategy and path and then use the studio's print function to print the graphics followed by using the cut functionality to cutting it. However, to my surprise, the software does not support SVG nor PDF nor any other vector format except DXF. That seems odd.. well it does not anymore, when you realize, that your cutter actually costs $50 more than you thought.. that's how much the license upgrade will cost to get a more capable software so you can actually use your cutter! I was arguably short on time, but this is just a rip-off and i was not willing to pay a dime more than what i purchased my cutter for, especially not if i was being ripped off with a technique like that.. this just isn't right..
the simplest solution to work around this limitation would be to just export your graphics to PNG format and then import that into Silhouette Studio. However, there is an issue with that: 1.) i don't want to print the borders of my playing cards, i just want to cut them. This could be worked around by using an offset and draw a wider border around the cards and then use a negative offset in the studio app to cut inside the line..
2.) that's the bigger one: by tracing a png image, you loose accuracy because tracing struggles with unsharp edges and anti-aliasing.. in the end your cutter is not going to cut nice round shapes but rahter stairs. maybe it won't be visible at first glance and good enough, but being a bit of a techy person it just hurts to know, that i had the data all in nice vector format and then, through a stupid workflow, tunred it into an inaccurate odd shape.
The Solution
here is the workflow i followed in the end to print my graphics directly from inkscape and then cut it with the cutter through the free version of the studio app.
luckily the stuido basic version was left with one vector format that it has in common with Inkscape: DXF. While DXF contains only outlines, it is a vector format and all we want to pass to the studio app in the end is a cut path, anything else can be done in inkscape, so that should be good enough for us.
Step 1: get the markers
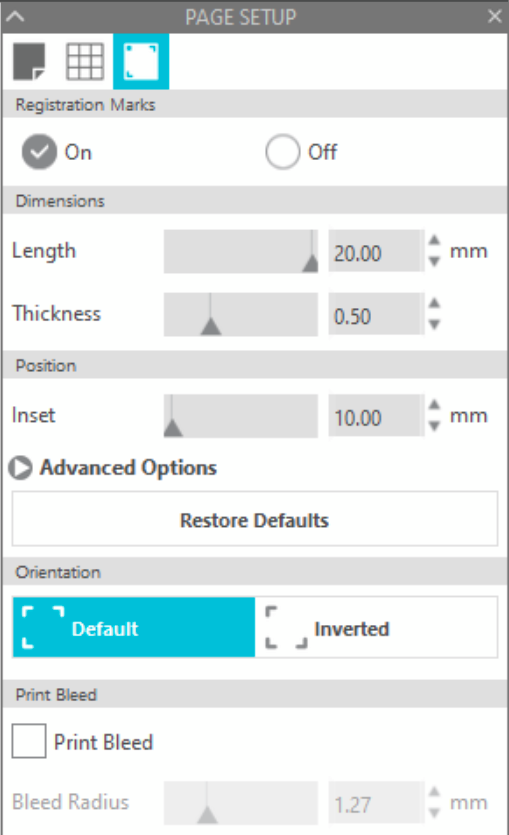
as a first step, create a new project in Silhouette Studio and in the page setup dialog choose your paper format and orientation. then switc hover to the “Registration Marks” tab and select “On”.. in case it is grayed out, draw a rectangle or anything on the working area and it will become available.
now choose some universal registration mark settings. i went for maximum Length and minimum Inset, in order to maximize the cutting area:

now hit print and use the windows PDF printer, to create a PDF file.
this file with the Registration marks on it, can now be imported into inkscape. make sure it is kept at full size and use it in a background layer when creating your design.
create another layer in your design where you will keep the cutting lines you want the cutter to follow. This cutting line document should also contain a rectangle that follows the page borders of your document. make it exactly the size of your A4 paper (210x297mm) and make sure it has its origin at 0x0.
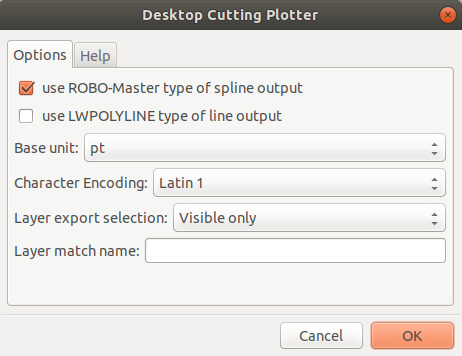
when you are done with your deisgn, make only the cutting line layer visible and go to File→Save copy. Now choose Desktop Cuttin Plotter (AutoCAD DXF R14) *.dxf as filetype and hit save.
in the dialog choose to save only the visible layers and select the ROBO-Master format:

back in Silhouette Studio Basic, go to File→Open and open your DXF file.
you will notice that your dxf has shrunk to a smaller dimension. sadly in the current version of Studio there is a bug that you can't change this behavior for importing DXF files, as soon as you change the setting, Silhouette Studio crashes. But that's what we made the frame following the page border for. Click on your imported dxf graphics and use the size fields in the toolbar to enlarge it back to its orinigal 210x297mm and origin 0x0.
now go to the registration marks tab again and choose the same settings as before.
finally go to the “Send” interface and do whatever you normally do to cut a job.
to print your graphics, go back to inkscape and print your graphics WITH the marker layer and WITHOUT the cutting path layer.
finally put your printed graphics on the sticky cutting foil and start your cut job.
For future projects, you can skip the first steps to create the registration marks, simply re-use your pdf or even create an inkscape template with the marks on it and re-use that :)